Monday, 9 September 2013

Experimenting with resin #1

As much as I love trying out new crafts, I always thought resin jewellery would be too complicated and technical to create, and that I'd need a load of fancy kit before I could make anything. After looking a bit more into it, I learnt that there are different kinds of resin: polyester resin which is generally more toxic and for bigger products, and epoxy resin which is great for small projects and is relatively non-toxic. I watched a couple of Youtube videos and saw that as long as instructions were followed properly, it was really simple to make resin jewellery.

So after a bit of a post pay-day rush I decided to go for it and make my own! It required quite a bit of kit which wasn't particularly cheap (I probably spent between £40-50 initially, but am hoping that once I reach the level where I can sell things, it'll all be worth it.)

I used:

-  Easy Cast Clear Casting Resin (16 fl oz for £19.75) but I was also told on Twitter that Gedeo brand crystal resin is good too (thanks @Dollycool!). I used a bit less than 2oz to make 16 cabochons (the dome shaped resin bits) so you do get quite a bit for your money.
- 16 cabochon mould specifically for resin moulding. I read conflicting advice about using other moulds such as ice cube trays and chocolate moulds onlines, so I decided to play it safe.
- Trylon translucent pigments in magenta and blue. You can pick up the pigment with a stir stick and then stir this directly into the resin before it is poured into the mould.
- Disposable gloves to protect your skin from the resin (and because that stuff is bloody sticky).
- Wooden lolly sticks used to mix the resin together/add pigment. You can buy stir sticks online but I already had lots of wooden lolly sticks knocking around.
- Measuring cups - To ensure the resin sets properly you need to precisely measure the resin and hardener at a 1:1 ratio which you'll then need to mix together in the cups. I accidentally bought small measuring cups instead of large ones but this actually worked well as it allowed me to do several separate mixes of resin, some without pigments, some with pigments and some with glitter.
- Newspaper to cover the work surface.
- Things to cast! I have a lot of glitter and sequins lying around the house, and I also bought some sugar sprinkles and Fimo fruit beads to experiment with. Although I read that casting flowers requires them to be fully dried out first so they retain their colour and shape, I thought I'd try casting a couple of fresh petals.
- Nail file to sand down uneven edges once the cabochons are removed from the mould.
- Hairdryer to add heat to the wet resin in order to remove air bubbles. (This was a tip I found online but I didn't find it particularly effective!)
- A Bostik Handy hot melt glue gun to attach my cabochons to ring backs.


Work station ahoy!

I will say that I initially found the resin really difficult to pour, firstly straight from the bottle into the cups, and then from the cups into the moulds. Not only was it incredibly runny but it took a few seconds for the resin to level out meaning that it was difficult not to overflow each dome! I worked out that if I scooped a bit of resin onto a stir stick I had more control in applying the resin than I did from just pouring from the cup into the moulds.


All poured! It says for moulds an inch thick you should leave 24 hours for a soft set for 72 hours for a hard set. My curiosity got the better of me and I left them for about 50 hours before taking them out of the moulds...


Out they pop! My little resin jellies!


Unfortunately there are quite a lot of air bubbles in a few of them, and a couple have come to the top and made a crater in the surface. I'm hoping this can be sorted by adding a tiny drop of resin in the hole to seal it.


I filled a couple of the moulds too high so some of the cabochons have a thin resin layer around the outside which is what you can see in the above photo. This just needs to be sanded away with a nailfile to crate a smooth edge.


I had a small amount of resin left over so I also tried using the resin as a way to embed some of the Fimo fruits without fully submerging them. Gold glitter was poured into the cup with the resin and then mixed fully to create the sparkly background! I'm not too sure what I'll do with these bottlecaps. It'd be nice to make them into necklaces but first I'd need to find some way to make a hole in them to allow for a chain to be attached.

After having no luck with the Crafter's Pick The Ultimate! Glue (it took ages to dry and didn't give a strong enough hold) I followed the advice of @almighty_faye on Twitter and bought a Bostik Handy mini glue gun for about £11 (and you can get 14 refill sticks for around £4). Once applied, the glue dried almost instantly and created such a strong hold that the ring back showed no sign of falling off. Excellent! So here are the finished rings so far:


This is by far my favourite. It reminds me of a fruit jelly!


As you can see, thanks to the glue gun there's no visible glue around the edges of the ring back but it's still glued on firmly.


This ring was done by adding a thin laser of resin to the mould before shaking in some turquoise glitter, and then adding more resin over the top that had been mixed with a magenta translucent Trylon pigment. It reminds me of the galaxy!


I like the depth of this one and that you can see the sequins throughout! This is achieved by layering up resin and sequins rather than having them all at one position in the mould.


Hooray! As I don't have any workspaces in my uni house I can only make these at my parents house for the time being. I'll get to see the second batch at the weekend and my mum has informed me that a few of them look like either glass eyes or nipples, so I'm excited to see them! Ha! Hopefully once I get the hang of this a bit more I'll be able to start selling them on my Etsy. I've already had good feedback about them and I'm really happy that my first practice with resin went well and that I want to continue with it!

So watch this space for more creations...

Caf
x


Monday, 12 August 2013

An orange poo named Zingy

In 2012, EDF energy brought out a series of adverts featuring a cute little orange character called "Zingy". Often referred to as "the orange poo", he seems to have found a place in the hearts of many, and it was only inevitable that someone would create a crochet/knitting pattern so that people could create their own Zingy.


My favourite free pattern so far is by Samigurumi and can be found here. The best thing about the pattern is that it's very easy to follow, doesn't require much yarn at all (<50g DK yarn) and doesn't take a whole lot of time to complete.


The first Zingy made, complete with felt eyes and nose, and button eyes.


After running out of white felt and being asked to create another Zingy as a birthday present last minute, I decided to crochet two circles and sew them on. For the circles I simply did:

Row 1: 6sc in magic ring = 6
Row 2: 2sc in each sc = 12 
Row 3: *sc in first sc, 2sc in next sc* all the way around = 18 sc
Finish off with slip stitch in next sc

Now aren't they cute?! It's hard to resist being filled with happiness when you have one of these sat on your shelf!

Caf
x

Tuesday, 6 August 2013

Soft Shells Stitch Crochet Baby Blanket

After finding out the joyous news that my Auntie is expecting her first baby in October, I decided to attempt my first ever blanket in order to create a gift that was both unique and straight from the heart! I'm not particularly good at maintaining a constant tension when crocheting and knitting which is why I tend to stick to 3D projects such as amigurumi and soft toys where the tension doesn't matter - as long as it's tight! So I felt that a baby blanket wouldn't be too challenging due to their small size. Not knowing whether I was expecting a girl or boy baby cousin I opted for a colour scheme of pastel yellow, blue and green - the yellow and blue yarns are Yarnfair Baby DK bought from Wilkinson's and the green is King Cole Dollymix "Nil" colourway bought from Abakhan's, both in Manchester City Centre.

I wanted to find a relatively easy pattern which offered enough texture to be exciting but remain soft. This soft shells baby blanket by Brenda Bourg on Ravelry was perfect, as unlike a bobble stitch or similar textured stitches, the pattern was the same on both sides rather than one side being textured and the other side simply the inverse. I was worried at first that it would be difficult having never used a shell stitch but the pattern was very easy and each shell was simply *1sc, 2dc* in each stitch. It built up quickly and I was very happy with the finished blanket, as was my Auntie!

The only real addition I made to the pattern was the variation in the size (I could have made it bigger but ran out of yarn, and time!) and the decision to replace the suggested border with a scalloped edge, the pattern of which I found in a book and was simply *slip stitch, skip 2st, 5dc in next ch, skip 2st* all the way around.


Adding the scalloped edging...


Caf
x

Knitkini Top for Beginners

Ever since I learnt how to knit, I've wanted to make a bikini. Perhaps because instead of lying out in the sun, another disappointing summer has left me yearning to keep my boobs tucked up with a woolly sling, or maybe I just thought having a knitted bikini would be cool. I didn't particularly like the design of the written patterns I came across on Ravelry, so I resorted to Youtube. Lo and behold, I found a pattern for a bikini top that I actually liked the look of! The only thing is, as a relative newcomer to knitting, I found the video lacking in certain information which partly contributed to me making massive mistakes during the knitting process and only completing the final bikini top after five+ attempts! So this entry is an attempt to better explain the pattern shown in the video below, providing detail about how to work out the gauge for your bikini and projects in general.


For this project I used 4mm knitting needles and Sirdar Crofter DK, shade Plumage. The nice thing about this yarn is it has a Fair Isle Effect so you knit as normal but the colours arrange themselves in a way that imitates Fair Isle knitwear and gives your project a nice design at the end!

1. Obtaining the correct gauge & casting on

I rarely make things where obtaining the exact gauge is important, but in the case of a bikini top, taking a minute to work out the correct gauge means the difference between a wearable bikini and something the size of a cheese triangle that barely covers a nipple (please learn from my mistake). 

"Gauge" simply means stitches per inch. In order to work out the gauge for the yarn and needles you want to use for your project, you need to knit a small swatch of knitting and then measure how many stitches make up an inch.


You can see that my gauge here is 5 stitches per inch. 

In order to find out how many stitches to cast on you simply measure the width of your breast (make sure to measure it all the way around from your side up to where it meets the centre of your chest), and then times this by your gauge, rounding to the nearest even number. So my measurements were 9 inches, so 9x5 = 45, rounded up to the nearest even number = cast on 46 stiches.


2. Knitting the base of each cup

The base of each cup is knitted in stockinette stitch (knit one row, purl one row) and to work out how many rows of stockinette stitch to do, you need to get your tape measure out again and measure how many rows of stitches make up an inch.


In this example you can see that 6 rows of stitches make an inch.

You will then measure from the base of your breast to the centre of your nipple, and again times this by your gauge, rounding up to the nearest even number again. My measurements are 3.5 inches, so 3.5 x 7 = 24.5, round to the nearest even number = I will knit 24 rows in stockinette stitch before I move to the next stage of the pattern.

Completing the rows of stockinette stitch.

3. Beginning the decrease rows (shaping the cups)

For the next stage of the pattern, you will decrease twice on each row. This will create a seam down the centre of the cup, giving it shape. Each decrease will occur in the middle of the row over four stitches, but other than these two decrease stitches each row, the stockinette stitch will continue as normal (you will knit one row, purl one row & repeat).

This is where it gets slightly complicated, but don't get put off. The next section is simply to work out how many stitches you need to knit, but in order to avoid getting confused I'd advise watching this alongside the video at the start of this entry.

Now for the maths!

Minus 4 from the number of stitches you cast on, and then divide this number by two.

For my bikini, this is 46 - 4 = 42, divided by 2 = 21

The number you are left with is the number of stitches you will knit. Once you have knitted these stitches, you will carry out the first decrease stitch. I won't explain any more of the pattern as the video does a good job of explaining this part (starting at 2.20) but remember to replace the amount of stitches she knits with the amount you have worked out for your gauge!

Carrying out the decrease rows - note the shape of the cup has changed from rectangular to triangular.

When it came to sewing the two cups together I found the bikini top wasn't tight enough to offer support when they were sewed together at the very edge, so I sewed them with an overlap of about 4 stitches, and then crocheted a flower to cover any ugly joins, and sewed a button on top to finish off.

Ta-daa!

I hope this tutorial has been handy and not too confusing. If there are any parts that don't make sense or are unclear please let me know, as I think everyone should have at least one woolly bikini top in their wardrobe!

Caf
x
1940s Mesh Crochet Collar

After having a browse through this lovely blog by Lady Jardin and some of her amazing crochet creations, I saw a link for free vintage crochet patterns and thought I'd have a go at making this crochet mesh net collar. Considering collars are back in fashion - especially the Peter Pan style - I quite like how this one is different to most I have seen and also has a very vintage glamour feel to it.


The pattern recommended using fine crochet cotton and a 1.5mm crochet hook, but I dislike working with fine yarn as I find it very fiddly and less enjoyable than working with a normal to chunkier yarn. A while ago I bought a big ball of James Brett Top Value DK in white that was a lot thinner than I realised and have been dying to find a use for it since, so with a 3mm hook I figured it would be perfect for this pattern.


After doing 3 rows of DC I started the first row which stated to chain 4 then sc in each stitch but I didn't like how much this caused an overlap so I unraveled it and did the first row of netting again.


Skipping out a chain in between each sc makes the collar look a bit less cluttered, although it does reduce the unique volume of the original collar and make it a bit too flat.


Getting progressively bigger...


The desired length! I just continued it until it reached my shoulders when I tried it on.

I added a couple of pearl buttons and corresponding button-loops, although I would recommend adding a block of crochet with two slits in for buttons instead of just making 2 chain loops as they seem too delicate to withstand much wearing.


And voila! I'm not hugely happy with how this turned out as the original photo of the collar shows a more visible graduation of spacing between the size of the netting from the top of the collar to the bottom, and it is also slightly longer than mine. I think it would have looked better if I had actually stuck to the original pattern and used thread weight cotton, or if I'd have used a chunkier yarn and turned it into more of a shawl, as seen in Lady Jardin's blogpost. Although the collar in the original photo doesn't sit as flat on the chest I do think this is quite a unique design and would be a great addition to a glamorous vintage outfit!

You can find the link to the original pattern here.

C.


x

Work in Progress - Strawberries and Cream Wave Blanket

I've been crocheting for just over a year now, but I am often really impatient with what I'm making and get frustrated if I can't start and finish a project within a couple of hours. I decided that instead of setting myself projects I expect to finish quickly, I would start a blanket to have as an ongoing project, meaning that I'd get used to having something on the go rather than getting annoyed when it wasn't finished! The good thing about this pattern is that it is simple and repetitive and so the perfect thing to do whilst watching television.

I luckily stumbled across The Reader's Digest Complete Guide to Needlework during one of my Oxfam shifts and priced at £5.99 there were enough crochet and knitting patterns to justify buying it, as well as detailed and informative instructions for the other crafts that are basic enough to teach yourself from. Having flicked through it and already used some of the patterns I can safely say this book is invaluable and would recommend it to all yarn lovers, especially as there are some copies selling on eBay.


For my blanket I decided on this wave stitch because I love how wavy blankets look and it also seemed a very easy pattern to follow. I cast on 169 stitches and my blanket measures 38 inches wide, the perfect width for a blanket to snuggle in whilst watching television but perhaps a bit too small to cover a single bed. I also like this pattern because a lot of the wave patterns I have seen don't have the gaps between each wave which I like, and also skipping the two stitches to make the gap reduces the amount of time it takes to crochet each row - very useful if, like me, you aren't used to working on something so big and get frustrated at a lack of speedy progress!

*I will point out here that the UK vs US crochet terminology often causes confusion, and as I taught myself crochet from American tutorials I am familiar with the US terminology and often have to look up the UK equivalent to be able to follow UK patterns. Here a tr is just a dc in US terms!*

I have been doing ten rows of each colour, and using Patons Fab DK in shades Cream and Strawberry (not sure why it's called strawberry as it's more of a deep pink) but it's quite fun to say my blanket is made of Strawberries and Cream.


I'm not sure how long I'll go on crocheting for, I have a couple more balls of wool and will probably stop when those run out. Not sure if I'll sell this, gift it or keep it for myself, I'll see how much I like it once it's finished!

Caf
x
Tuesday, 30 July 2013

Work in Progress: Oxfam Granny Blanket!

Since I've started volunteering at Oxfam I've noticed that we get a lot of yarn donated, however it's often just a bag of someone's yarn stash consisting of lots of small balls of wool that we can't sell. Considering all I ever go on about is crochet and how much of a crochet nerd I am, today the deputy manager asked if I'd like to go away and make a granny blanket that they would then sell in the shop! Considering I attempt to start about 7 different projects a week (and normally give up about 10 minutes into each), I love it when people request things for me to make as it gives me more of a purpose and I find it motivating!

Some of the balls were completely moth-eaten (a shame, because some of it was actually wool rather than the cheap acrylic stuff I normally buy) but all in all there's a nice combination of different weights and colours, as well as some alpaca yarn and plenty of cotton! Just look below at HOW MUCH WOOL THERE IS!


So as much as I love completely random and thrown together colours and designs, I'm also a bit of a perfectionist so I find it hard to make something without a distinct colour scheme or design. I've thrown together a couple of large granny squares tonight just watching TV, I reckon I'll do a couple of big granny squares and then do a couple of borders and then some other random squares until it's just a huge massive fantastic blanket! Not really sure how to incorporate the chunkier yarn yet, as I've stuck to the same 4mm hook so far to make sure the gauge is the same for the whole thing so that it sews together easier. Maybe I'll make another mini blanket? Who knows!


Watch this space, I'll keep updating as I do more of it :)

Caf
x

Sunday, 28 July 2013

Long time no see!

Hello folks!

I have been a bit inconsistent with this blog as of late, and after a bit of tidying up, the last post now goes all the way back to January! After finishing my third year studying Geography I've decided to carry on and do a fourth year. As it's probably the last summer where I can spend several months relaxing and doing what I want, I've decided to fill it with as many crafts as I can! I can happily say I've finally come off Citalopram and although I've had a few wobbly days I feel great for it and have managed to volunteer every week in my local Oxfam shop since February, as well as doing some volunteering through university. I've also managed to go swimming on my own once a week! I am really happy at how far I have come with my anxiety as although I still struggle a bit with phonecalls, I've managed to do most of the things I couldn't have dreamed of doing even at the start of the year, and I finally feel like there really isn't anything stopping me from doing what I want to do - something I've never been able to think before! So my outlook is looking a lot more positive and I'm really excited for things to come.

As I've been getting more into my crafts, I tried to start a new blog exclusive to crochet, knitting and the like, but I lost patience with it and it wasn't really hitting off so I've instead decided to merge those posts in with this blog. I'll probably also blog a bit more about what I've been up to - if it's anything vaguely exciting - so this blog will become a bit more varied and less of a place I only come to moan and talk about my problems!

Caf
x
Friday, 25 January 2013

Note to self: Please do these things in 2013

Decided that maybe if I make a list of things I want to do/achieve this year (and things I often have avoided doing due to anxiety) I will be more obliged to do them. So here it is:

Note to self for 2013


- Apply for volunteering positions, preferably in a shop so you can finally learn how to use a till!


- Start to volunteer with Student Action at uni such as helping out at parties for the elderly or the film afternoons they hold or with the homeless JUST DO ANYTHING CAF IT'LL BE ENJOYABLE


- Start to go swimming regularly, hopefully on your own (even though this is quite high up the hierarchy of things that set off your anxiety, so you might have to drag boyfriend or friends along first)


- Keep going to Knitting Society meetings every other Tuesday, as when you have been it's been a barrel of laughs and a nice way to unwind from uni work (you are sad that you didn't get to go much last semester so will try and make the most of it this year) and stop panicking about how you might not know anyone as you've been before and it was not only fine but really fun AND you didn't even need alcohol to feel relaxed


- Look for knitting/crochet groups in Manchester (if it's free and there's time)


- Join a nude drawing class?! (because come on Caf, you love genitals and you miss drawing quite a lot)


- Be confident enough to apply for jobs over summer (this is the big'un, what with never having a job and the thought of even applying for a job filling you with such inadequacy that you want to sink into the floor like a slug that's just come into contact with salt)


COME ON CAF! YOU CAN DO IT! YEAHHHH!

Sunday, 30 December 2012

Latest creation: Magic Garden

I haven't had a lot of time to crochet recently because of the uni work piling on in third year *grumble* but whenever I get the chance to crochet it's a nice way to relax and try and forget that I'm drowning under a sea of books and journal articles...

So here is my latest creation for my friend Emily's 21st (@emily_rebecca), a magic garden complete with mushroom house, button-tree with a whimsical owl on top, two accidentally creepy looking rabbits and a golden sequin path. I made the flowers on the left hand side by crocheting three or four different sewing threads together using this pattern. To make sure it stood up (the circle base was a bit floppy!) I sandwiched a piece of card between the base of the garden and another circle made using double crochet, to give it a solid foundation.

And here it is!


I'm extra happy because this is one of the first things I've made that I have improvised, on the most part without any patterns. I did take inspiration from these amazing crochet houses by meekssandygirl on Flickr: 


Monday, 22 October 2012

Anxiety, CBT & the quest for "normality"

So following on from my last non-wool related blog post, I finally went to my doctors and decided to ask about talking therapies on option.

It seems I definitely do have social anxiety. A catch-22 if you like, as the main issue I have is worrying about what other people think of me, and making a fool of myself. Therefore when I tried to seek help about my anxiety in the first place I downplayed it (worried my doctor would think I was silly) and made it seem like it wasn't an evil parasitic twin following me around and endlessly ruining my fun and happiness. 

I was put on anti-depressants to deal with my anxiety, and I can't really fault them. I needed a quick fix because at the time I finally sought help about my anxiety and went to my GP I felt like a ticking bomb that could blow at any moment. I was permanently anxious and the tiniest thing could tip me over the edge and render me useless for the next day or two. Obviously I didn't expect to be wrapped up in a blanket by my GP and for him to flip head over heels to make me feel less like I was going to blow up every time I encountered a troublesome situation, but the whole "here have these tablets they will make you feel better, now off you go" thing meant that I hadn't really addressed my problems at all, and simply had a quick fix for something that had been bothering me for most of my life, and would continue to so if I didn't do something.

While I feel that being put on tablets helped me out massively, it also drew me into a false sense of security. Anxiety is multi-layered and revolves around physical symptoms (breathlessness, cold sweats, feeling clammy, lightheadedness, butterflies...), thoughts and behaviours. The tablets pretty much eliminated the physical symptoms which made me think that I was miraculously cured of anxiety. Not having the physical symptoms was great, and allowed me to function somewhat normally in situations where I would normally turn into a quivering sweaty mess and want to adopt the fetal position in situations where it would  have been a bit inappropriate (buses, lectures, cinemas). However because I hadn't dealt with why I was actually anxious in the first place, the thoughts and behaviours were still there.

For example, things I have problems with: 


phone calls; being in quiet spaces; being in places where it's hard to leave without being noticed; getting off buses; having people in the house I don't know; going to new places, doing things on my own; being at the till in shops...

 While I would be able to manage most of these things now I'm on the tablets and am a lot calmer and don't physically feel like I'm going to invert with panic, there is still a mental block - the anxious thoughts are still there, which leads to anxious behaviours. In my case this involves avoiding a lot of situations, then getting really frustrated at myself, and then crying into a pillow once a month thinking the world is going to end.

So, I went to the doctor and expressed that while the tablets are great and please can I have some more, I also really want to come off them. Being on tablets doesn't really bother me because simply what I was experiencing before the tablets was hell on earth, but they have made certain parts of my genitals as responsive as a dead fox and also make me fall asleep after one pint. Not ideal. So I decided that I would try out CBT to try and combat the way I think and react to my anxiety, and then attempt to come off the tablets. In my head it doesn't make sense to come off the tablets without dealing with the mental aspect of my anxiety, as coming off tablets to me suggests some kind of end process and considering I panic and hide under my duvet whenever the phone rings, I don't think I'm quite ready yet...

The CBT!

I was referred to Self Help Services  (not sure if this is exclusive to Manchester or a national thing) and just had to confirm whether I wanted an appointment and which type of treatment I wanted (online, one-on-one sessions, or group sessions). I was given a practitioner and initially had an hour in which I was able to talk about everything I was bothered about. I was surprised at how easy it was, as I guess the woman was used to irrational anxieties and phobias, so hearing about my thought processes and the things I fear the most seemed pretty normal to her, even if they seem a bit odd to me and other people I've spoken to!

Then over the following weeks (going up to last week) we looked at what goals I hope to achieve, and how I'm going to achieve them. She sent me away with loads of things to read to better understand anxiety and also some information on muscle relaxation and breathing exercises - which I had always been too lazy to do but now I've tried them they actually have worked. Hooray! 

I then was told to keep a thought diary, which involves thinking fully about each situation that causes me anxiety, and to identify the thoughts and feelings I have at that moment and to give them a % rating of how anxious I felt (0 being the least and 100 being the highest). I then had to distance myself from the situation, and try and give evidence for and against what I was thinking, which was useful as it taught me to think rationally about a situation instead of in my panicky mindset which is usually along the lines of "AHHHHHHHHHHHHHHHHH!"

An example:


(I hope this is actually readable...) 


Now I've started doing this for various situations, I've started to note a difference in how I approach certain situations as I become more aware of what I'm doing and can maintain a clearer head if I do start to panic. I'm really happy with how the CBT is going and finally feel like I'm actually making progress in getting the confidence to confront the situations I have always avoided. Before I started CBT, the only time I really got to speak about my anxiety was to friends or really briefly to my doctor in order to prove myself unstable enough to get more medication (fun fun). Talking is good and all, but actually doing these exercises to combat the way I think about things, and in turn how I react to them seems to be the key to finally sorting myself out.

 Next step is to actually implement this into gradually exposing myself to the situations I fear, taking little steps from the smallest worries to the biggest. Eek!

Tuesday, 18 September 2012

The Big Woolly Crochet Moomin Blog

Over the past few months I've been crocheting moomins. I've made three, and every time I make them I forget how much time and effort they take and I want to cry before I've even gotten round to assembling them. However once they are finished I think they look quite impressive and are probably the most rewarding figures I've crocheted so far. 

After trawling the web, I found this pattern from Crochet Amigurumi Blogg. Unfortunately it's in Swedish so it took me a while to get the hang of the pattern and it took me forever to work out the pattern, but I worked out in the end that "tills" is the same as a stitch decrease (sc2tog) and as long as you make sure the number of stitches add up at the end of each row you should be dandy. If you plan to make a moomin I'd strongly suggest using a stitch marker and moving it as you crochet each row, as especially in the head, every row seems to be different and it's easy to lose track of where you are up to! As a result, the first moomin I made had more of a bulbous bulge than the cute moomin snout, and as much as people compliment me on it, I'll always look at it with a bit of disdain...

Although I occasionally post photos of the moomins in progress and after they are finished, I thought it would be quite nice to put them all in one place and explain a bit about the making of them, which hopefully will also be useful if anyone fancies having a go at crocheting one.


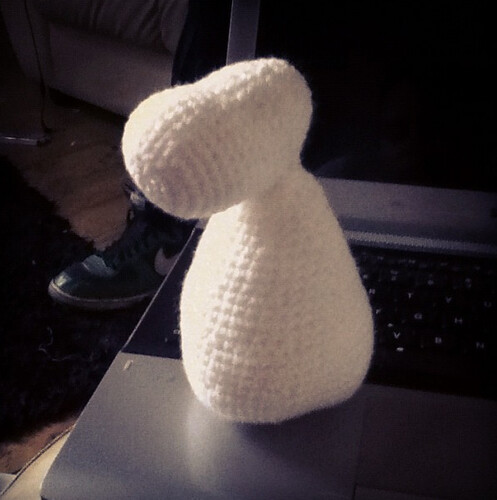
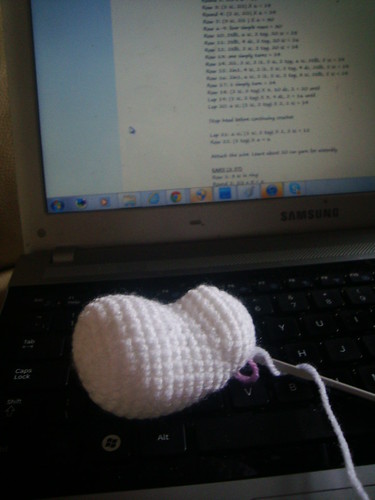
The first thing to start with is the head. The number of stitches, and most importantly where you decrease stitches, gives the head the moomin shape. This is why it's important to use a stitch marker, because if you miss out stitches then you might end up decreasing in the wrong position and your head won't be the right shape! Here the head is ready to stuff.


Next, to the start the body.
Here is the base of body (the black thread acting as a stitch marker). 
Unlike with most amigurumi/stuffed toys I've made in crochet, you start at the bottom of the body and crochet upwards.


Here I am continuing to crochet the body from the bottom upwards, to create a basket shape.


Eventually you will decrease the amount of stitches per row so the body gets a conical shape and will taper up to form the upper body and neck.


Once the body and head are finished, stuffed full of fiber filling and fastened off, the head is sewn to the body.


The ears and made and sewn on, and the limbs and tail are then made, stuffed, and sewn on.

Moomin II, made for my best friend Rach

Then it comes to the details!
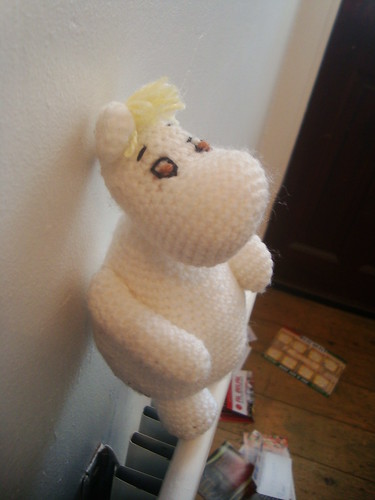
 Yellow yarn can be sewn into the top of the head, and if you separate the individual yarn strands you get a lovely blonde fringe (great if you want to make a Snorkmaiden moomin!). 
The eyes can be embroidered on, and here I used black and brown embroidery thread. I originally tried to make the eyes out of felt but I didn't feel there was enough of a contrast between white or cream felt (for the pupils of the eye) against the white wool of the moomin. Safety eyes could also be used, but I don't feel they would make it look much like a moomin!

Moomin II posing on our radiator.

I was then asked to custom make a moomin for a fellow Twitter-er. I used a design similar to Moomin II which can be seen above. I call this one Moomin III (even though I based the last two on the character Snorkmaiden so they really should be Snorkmaiden I & II...OH WELL).

The back of Moomin III.

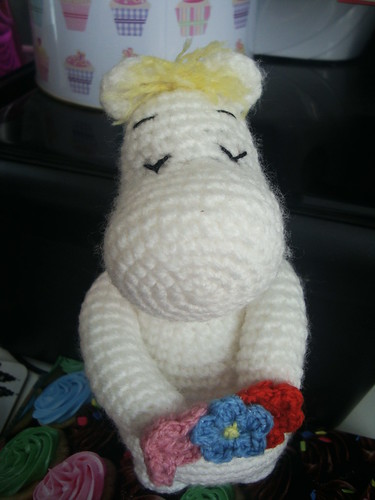
I based the details of Moomin III on this photo and I'm very happy with the result!


Ta-daaa!

For this moomin I changed the position of the arms and stitched them into the body so that they appeared to be more closed. I was then able to create some tiny flowers using this easy pattern by Jodie Kundhi and stitch them together and to the front of the arms, to give the appearance that the moomin is offering flowers. I stitched a bit of the same coloured yarn as the hair to make the flowers look a bit more exciting.

I also changed the embroidery of the eyes to appear closed, as I felt it made the moomin look cuter than embroidering on wide open eyes.


So there we have it. Woolly crochet moomins!

I am happy to custom make moomins, however they do take quite a bit of time and effort, and as I'm starting back at uni on the 24th September I need to start balancing crochet with uni stuff (sad face). 
However if you'd like me to make you a moomin, please DM me on Twitter (@shutupcaf) 
:)