Showing posts with label crochet. Show all posts

Monday, 12 August 2013

An orange poo named Zingy

In 2012, EDF energy brought out a series of adverts featuring a cute little orange character called "Zingy". Often referred to as "the orange poo", he seems to have found a place in the hearts of many, and it was only inevitable that someone would create a crochet/knitting pattern so that people could create their own Zingy.


My favourite free pattern so far is by Samigurumi and can be found here. The best thing about the pattern is that it's very easy to follow, doesn't require much yarn at all (<50g DK yarn) and doesn't take a whole lot of time to complete.


The first Zingy made, complete with felt eyes and nose, and button eyes.


After running out of white felt and being asked to create another Zingy as a birthday present last minute, I decided to crochet two circles and sew them on. For the circles I simply did:

Row 1: 6sc in magic ring = 6
Row 2: 2sc in each sc = 12 
Row 3: *sc in first sc, 2sc in next sc* all the way around = 18 sc
Finish off with slip stitch in next sc

Now aren't they cute?! It's hard to resist being filled with happiness when you have one of these sat on your shelf!

Caf
x

Tuesday, 6 August 2013

Soft Shells Stitch Crochet Baby Blanket

After finding out the joyous news that my Auntie is expecting her first baby in October, I decided to attempt my first ever blanket in order to create a gift that was both unique and straight from the heart! I'm not particularly good at maintaining a constant tension when crocheting and knitting which is why I tend to stick to 3D projects such as amigurumi and soft toys where the tension doesn't matter - as long as it's tight! So I felt that a baby blanket wouldn't be too challenging due to their small size. Not knowing whether I was expecting a girl or boy baby cousin I opted for a colour scheme of pastel yellow, blue and green - the yellow and blue yarns are Yarnfair Baby DK bought from Wilkinson's and the green is King Cole Dollymix "Nil" colourway bought from Abakhan's, both in Manchester City Centre.

I wanted to find a relatively easy pattern which offered enough texture to be exciting but remain soft. This soft shells baby blanket by Brenda Bourg on Ravelry was perfect, as unlike a bobble stitch or similar textured stitches, the pattern was the same on both sides rather than one side being textured and the other side simply the inverse. I was worried at first that it would be difficult having never used a shell stitch but the pattern was very easy and each shell was simply *1sc, 2dc* in each stitch. It built up quickly and I was very happy with the finished blanket, as was my Auntie!

The only real addition I made to the pattern was the variation in the size (I could have made it bigger but ran out of yarn, and time!) and the decision to replace the suggested border with a scalloped edge, the pattern of which I found in a book and was simply *slip stitch, skip 2st, 5dc in next ch, skip 2st* all the way around.


Adding the scalloped edging...


Caf
x

1940s Mesh Crochet Collar

After having a browse through this lovely blog by Lady Jardin and some of her amazing crochet creations, I saw a link for free vintage crochet patterns and thought I'd have a go at making this crochet mesh net collar. Considering collars are back in fashion - especially the Peter Pan style - I quite like how this one is different to most I have seen and also has a very vintage glamour feel to it.


The pattern recommended using fine crochet cotton and a 1.5mm crochet hook, but I dislike working with fine yarn as I find it very fiddly and less enjoyable than working with a normal to chunkier yarn. A while ago I bought a big ball of James Brett Top Value DK in white that was a lot thinner than I realised and have been dying to find a use for it since, so with a 3mm hook I figured it would be perfect for this pattern.


After doing 3 rows of DC I started the first row which stated to chain 4 then sc in each stitch but I didn't like how much this caused an overlap so I unraveled it and did the first row of netting again.


Skipping out a chain in between each sc makes the collar look a bit less cluttered, although it does reduce the unique volume of the original collar and make it a bit too flat.


Getting progressively bigger...


The desired length! I just continued it until it reached my shoulders when I tried it on.

I added a couple of pearl buttons and corresponding button-loops, although I would recommend adding a block of crochet with two slits in for buttons instead of just making 2 chain loops as they seem too delicate to withstand much wearing.


And voila! I'm not hugely happy with how this turned out as the original photo of the collar shows a more visible graduation of spacing between the size of the netting from the top of the collar to the bottom, and it is also slightly longer than mine. I think it would have looked better if I had actually stuck to the original pattern and used thread weight cotton, or if I'd have used a chunkier yarn and turned it into more of a shawl, as seen in Lady Jardin's blogpost. Although the collar in the original photo doesn't sit as flat on the chest I do think this is quite a unique design and would be a great addition to a glamorous vintage outfit!

You can find the link to the original pattern here.

C.


x

Work in Progress - Strawberries and Cream Wave Blanket

I've been crocheting for just over a year now, but I am often really impatient with what I'm making and get frustrated if I can't start and finish a project within a couple of hours. I decided that instead of setting myself projects I expect to finish quickly, I would start a blanket to have as an ongoing project, meaning that I'd get used to having something on the go rather than getting annoyed when it wasn't finished! The good thing about this pattern is that it is simple and repetitive and so the perfect thing to do whilst watching television.

I luckily stumbled across The Reader's Digest Complete Guide to Needlework during one of my Oxfam shifts and priced at £5.99 there were enough crochet and knitting patterns to justify buying it, as well as detailed and informative instructions for the other crafts that are basic enough to teach yourself from. Having flicked through it and already used some of the patterns I can safely say this book is invaluable and would recommend it to all yarn lovers, especially as there are some copies selling on eBay.


For my blanket I decided on this wave stitch because I love how wavy blankets look and it also seemed a very easy pattern to follow. I cast on 169 stitches and my blanket measures 38 inches wide, the perfect width for a blanket to snuggle in whilst watching television but perhaps a bit too small to cover a single bed. I also like this pattern because a lot of the wave patterns I have seen don't have the gaps between each wave which I like, and also skipping the two stitches to make the gap reduces the amount of time it takes to crochet each row - very useful if, like me, you aren't used to working on something so big and get frustrated at a lack of speedy progress!

*I will point out here that the UK vs US crochet terminology often causes confusion, and as I taught myself crochet from American tutorials I am familiar with the US terminology and often have to look up the UK equivalent to be able to follow UK patterns. Here a tr is just a dc in US terms!*

I have been doing ten rows of each colour, and using Patons Fab DK in shades Cream and Strawberry (not sure why it's called strawberry as it's more of a deep pink) but it's quite fun to say my blanket is made of Strawberries and Cream.


I'm not sure how long I'll go on crocheting for, I have a couple more balls of wool and will probably stop when those run out. Not sure if I'll sell this, gift it or keep it for myself, I'll see how much I like it once it's finished!

Caf
x

Tuesday, 30 July 2013

Work in Progress: Oxfam Granny Blanket!

Since I've started volunteering at Oxfam I've noticed that we get a lot of yarn donated, however it's often just a bag of someone's yarn stash consisting of lots of small balls of wool that we can't sell. Considering all I ever go on about is crochet and how much of a crochet nerd I am, today the deputy manager asked if I'd like to go away and make a granny blanket that they would then sell in the shop! Considering I attempt to start about 7 different projects a week (and normally give up about 10 minutes into each), I love it when people request things for me to make as it gives me more of a purpose and I find it motivating!

Some of the balls were completely moth-eaten (a shame, because some of it was actually wool rather than the cheap acrylic stuff I normally buy) but all in all there's a nice combination of different weights and colours, as well as some alpaca yarn and plenty of cotton! Just look below at HOW MUCH WOOL THERE IS!


So as much as I love completely random and thrown together colours and designs, I'm also a bit of a perfectionist so I find it hard to make something without a distinct colour scheme or design. I've thrown together a couple of large granny squares tonight just watching TV, I reckon I'll do a couple of big granny squares and then do a couple of borders and then some other random squares until it's just a huge massive fantastic blanket! Not really sure how to incorporate the chunkier yarn yet, as I've stuck to the same 4mm hook so far to make sure the gauge is the same for the whole thing so that it sews together easier. Maybe I'll make another mini blanket? Who knows!


Watch this space, I'll keep updating as I do more of it :)

Caf
x

Sunday, 30 December 2012

Latest creation: Magic Garden

I haven't had a lot of time to crochet recently because of the uni work piling on in third year *grumble* but whenever I get the chance to crochet it's a nice way to relax and try and forget that I'm drowning under a sea of books and journal articles...

So here is my latest creation for my friend Emily's 21st (@emily_rebecca), a magic garden complete with mushroom house, button-tree with a whimsical owl on top, two accidentally creepy looking rabbits and a golden sequin path. I made the flowers on the left hand side by crocheting three or four different sewing threads together using this pattern. To make sure it stood up (the circle base was a bit floppy!) I sandwiched a piece of card between the base of the garden and another circle made using double crochet, to give it a solid foundation.

And here it is!


I'm extra happy because this is one of the first things I've made that I have improvised, on the most part without any patterns. I did take inspiration from these amazing crochet houses by meekssandygirl on Flickr: 


Tuesday, 18 September 2012

The Big Woolly Crochet Moomin Blog

Over the past few months I've been crocheting moomins. I've made three, and every time I make them I forget how much time and effort they take and I want to cry before I've even gotten round to assembling them. However once they are finished I think they look quite impressive and are probably the most rewarding figures I've crocheted so far. 

After trawling the web, I found this pattern from Crochet Amigurumi Blogg. Unfortunately it's in Swedish so it took me a while to get the hang of the pattern and it took me forever to work out the pattern, but I worked out in the end that "tills" is the same as a stitch decrease (sc2tog) and as long as you make sure the number of stitches add up at the end of each row you should be dandy. If you plan to make a moomin I'd strongly suggest using a stitch marker and moving it as you crochet each row, as especially in the head, every row seems to be different and it's easy to lose track of where you are up to! As a result, the first moomin I made had more of a bulbous bulge than the cute moomin snout, and as much as people compliment me on it, I'll always look at it with a bit of disdain...

Although I occasionally post photos of the moomins in progress and after they are finished, I thought it would be quite nice to put them all in one place and explain a bit about the making of them, which hopefully will also be useful if anyone fancies having a go at crocheting one.


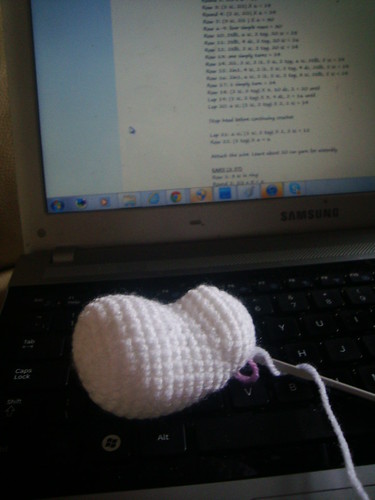
The first thing to start with is the head. The number of stitches, and most importantly where you decrease stitches, gives the head the moomin shape. This is why it's important to use a stitch marker, because if you miss out stitches then you might end up decreasing in the wrong position and your head won't be the right shape! Here the head is ready to stuff.


Next, to the start the body.
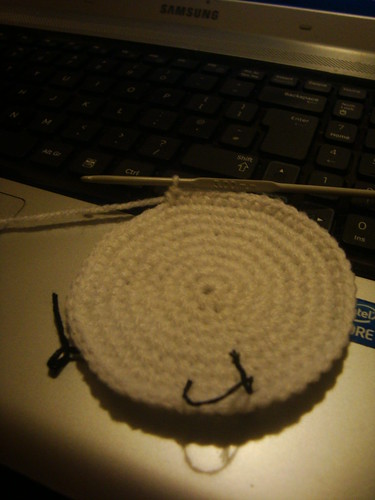
Here is the base of body (the black thread acting as a stitch marker). 
Unlike with most amigurumi/stuffed toys I've made in crochet, you start at the bottom of the body and crochet upwards.


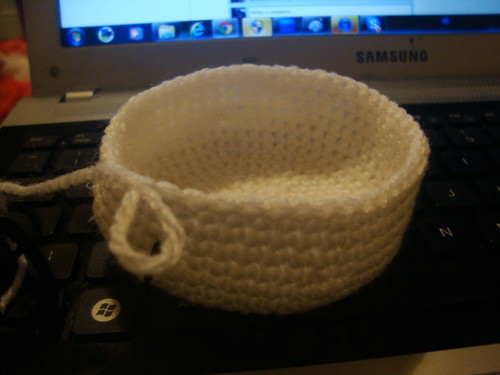
Here I am continuing to crochet the body from the bottom upwards, to create a basket shape.


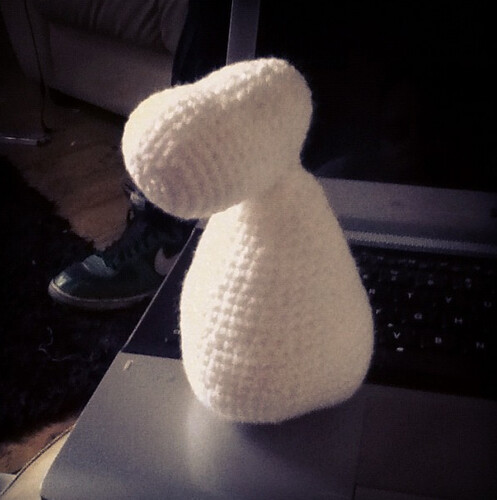
Eventually you will decrease the amount of stitches per row so the body gets a conical shape and will taper up to form the upper body and neck.


Once the body and head are finished, stuffed full of fiber filling and fastened off, the head is sewn to the body.


The ears and made and sewn on, and the limbs and tail are then made, stuffed, and sewn on.

Moomin II, made for my best friend Rach

Then it comes to the details!
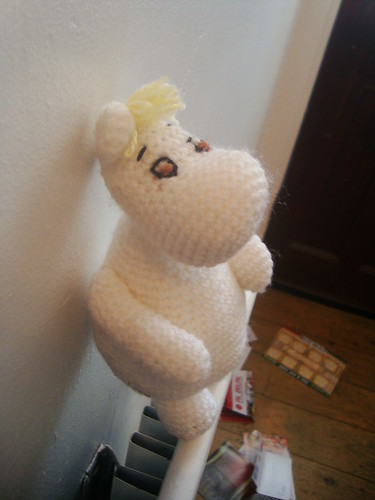
 Yellow yarn can be sewn into the top of the head, and if you separate the individual yarn strands you get a lovely blonde fringe (great if you want to make a Snorkmaiden moomin!). 
The eyes can be embroidered on, and here I used black and brown embroidery thread. I originally tried to make the eyes out of felt but I didn't feel there was enough of a contrast between white or cream felt (for the pupils of the eye) against the white wool of the moomin. Safety eyes could also be used, but I don't feel they would make it look much like a moomin!

Moomin II posing on our radiator.

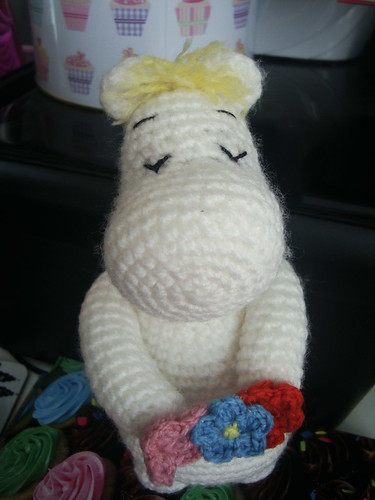
I was then asked to custom make a moomin for a fellow Twitter-er. I used a design similar to Moomin II which can be seen above. I call this one Moomin III (even though I based the last two on the character Snorkmaiden so they really should be Snorkmaiden I & II...OH WELL).

The back of Moomin III.

I based the details of Moomin III on this photo and I'm very happy with the result!


Ta-daaa!

For this moomin I changed the position of the arms and stitched them into the body so that they appeared to be more closed. I was then able to create some tiny flowers using this easy pattern by Jodie Kundhi and stitch them together and to the front of the arms, to give the appearance that the moomin is offering flowers. I stitched a bit of the same coloured yarn as the hair to make the flowers look a bit more exciting.

I also changed the embroidery of the eyes to appear closed, as I felt it made the moomin look cuter than embroidering on wide open eyes.


So there we have it. Woolly crochet moomins!

I am happy to custom make moomins, however they do take quite a bit of time and effort, and as I'm starting back at uni on the 24th September I need to start balancing crochet with uni stuff (sad face). 
However if you'd like me to make you a moomin, please DM me on Twitter (@shutupcaf) 
:)

Tuesday, 4 September 2012

Up, Up & Crochet!

A few months ago I got sucked into the addictive hoover that is crochet and I haven't been able to emerge since. I don't really mind though, it just means my house is covered in bits of wool and every day a new stuffed animal makes it onto our TV cabinet to obscure the view of the screen a little more. I planned on blogging about it from the start but due to general laziness and being too busy with...er...crochet, I never quite managed. So here I am, three-ish months later attempting to do my first crochet blog!

I gained an interest in crocheting when my mum bought me the Cath Kidston Crochet Book for Christmas which included a crochet hook, a few balls of yarn and an instruction manual. I wouldn't recommend it to anyone. The wool is bad quality, there isn't enough of it to complete the project (a granny square cushion) and the written instructions were impossible to work out, not just for someone who has never crocheted before, but even my mum (who has crocheted in the past) couldn't work out the basic stitches from the sketches in the book. I also felt it was also massively overpriced at £20, as you can get a crochet hook for £1-2 on the high street and a huge bundle of wool (not amazing quality but significantly better than those in the kit) for about £1.60 (Wilkinsons, Dunelm Mill and Abakhan Fabrics are my favourite places for wool, but you can also sometimes get cheap yarn in places like The Works). The tin was nice for decoration, until the lid fell off...so yeah.

Ms Octopus knows her shit.


I found the instructions in the Cath Kidston kit stupidly confusing, and so turned to Youtube for some tutorials. Thankfully, Youtube is full to the brim of EVERYTHING and has plenty of excellent crochet tutorials. I wanted to begin with granny squares, and stumbled across the user Bethintx1 who has some brilliant videos covering all sorts of crochet patterns and stitches. I found the tutorial for granny squares particularly good as you can clearly see what she is doing as she crochets, and it's slow enough for someone who has never crocheted before to pick up. After stopping and re watching the videos on granny squares constantly for four hours getting the stitches wrong over and over again, I finally got the hang of it, and I was off! To be fair, I haven't learnt many different stitches since I started, but the more you do it the better you get at getting neater, more even stitches (or I was just a shit beginner crocheter, haha).

Below is part 1 of the granny square tutorial. (The video uses American crochet terminology which is different from the British terminology, in case you want to learn the British terms. They are pretty easy to translate across, I just prefer the American terms as most of the patterns I use are American).


I also wanted to have a go at crocheting some small crochet animals (they are also known as amigurumi) so I found this tuturial on crochet pigs. I won't lie, it was a ridiculous amount of effort, took 8 hours and my first two attempts looked more like deformed bumble bees with legs, but the third one came out quite cute so I wasn't too arsed. Just following that one tutorial was enough to get the jist of written patterns too, which has meant I've been able to create a load of different animals fairly soon after I picked up my crochet hook for the first time.


Ta-daa!

Why you should give crochet a go? 

It's ridiculously satisfying, and once you learn the basic stitches (there's only really three or four) you can make most things...I've already made hats, door knob cosys, iPod pouches, cuddly tiny animals! It's all about keeping count of the amount of stitches, and trust me, once you start it's a really easy hobby, plus when I look at the things I've made I think they look so good compared to what I had to do to actually make them. It's a ridiculously rewarding hobby, just requires a lot of time and patience.

Anyway, I'll definitely be posting more about crochet in the near future so keep an eye out! :)